Showing posts with label Watch repair. Show all posts

Thursday, 27 April 2017

A Bluffers Guide to Watch "Bushing"

Three typical Watch bushes.
Where a steel pivot runs in a brass hole in the movement there will eventually be some enlargement of the hole, often turning it into an oval due to unequal pressure on it.

Occasionally there will be some wear to the pivot as well in which case the pivot will need to be smoothed and reduced in size which will result in it being loose in the hole.

Problems are most common on the fast moving and quite small 4th (Seconds) wheel and on the bottom pivot of the centre wheel which although it moves slowly it has a lot of pressure on it and can't be effectively oiled without taking the movement apart - so it seldom gets done.

To remedy this situation a brass Bush or "Bouchon" is set into the movement.


Part of my collection of Bushes, the two large ones bottom left are for
clocks, those for watches in the top box have an external diameter from
0.8mm to 3mm with a range of hole sizes and depths. These are New
Old Stock, the top set is still available but at £270 the set (120 pieces)
First the original hole has to be opened up to accommodate the size of bush required using progressively larger reamers in the Staking or Jewelling set, this will keep the centre of the hole in the right place.

The bush has to be a friction fit but not so tight that excessive force is required to push it in or the bush could be damaged or the movement distorted.

The reamer on the centre hole of a scrapped bottom plate. The metal is soft and the
tool very sharp so it is just turned by hand with no significant leverage required.
If necessary, which it usually is on the bottom plate, the bush has to be ground down to the same thickness as the plate, on the top plate the shaped end of the bush is left as it looks similar to normal pivot holes and helps with oiling. The bush is then pressed in using the staking set.

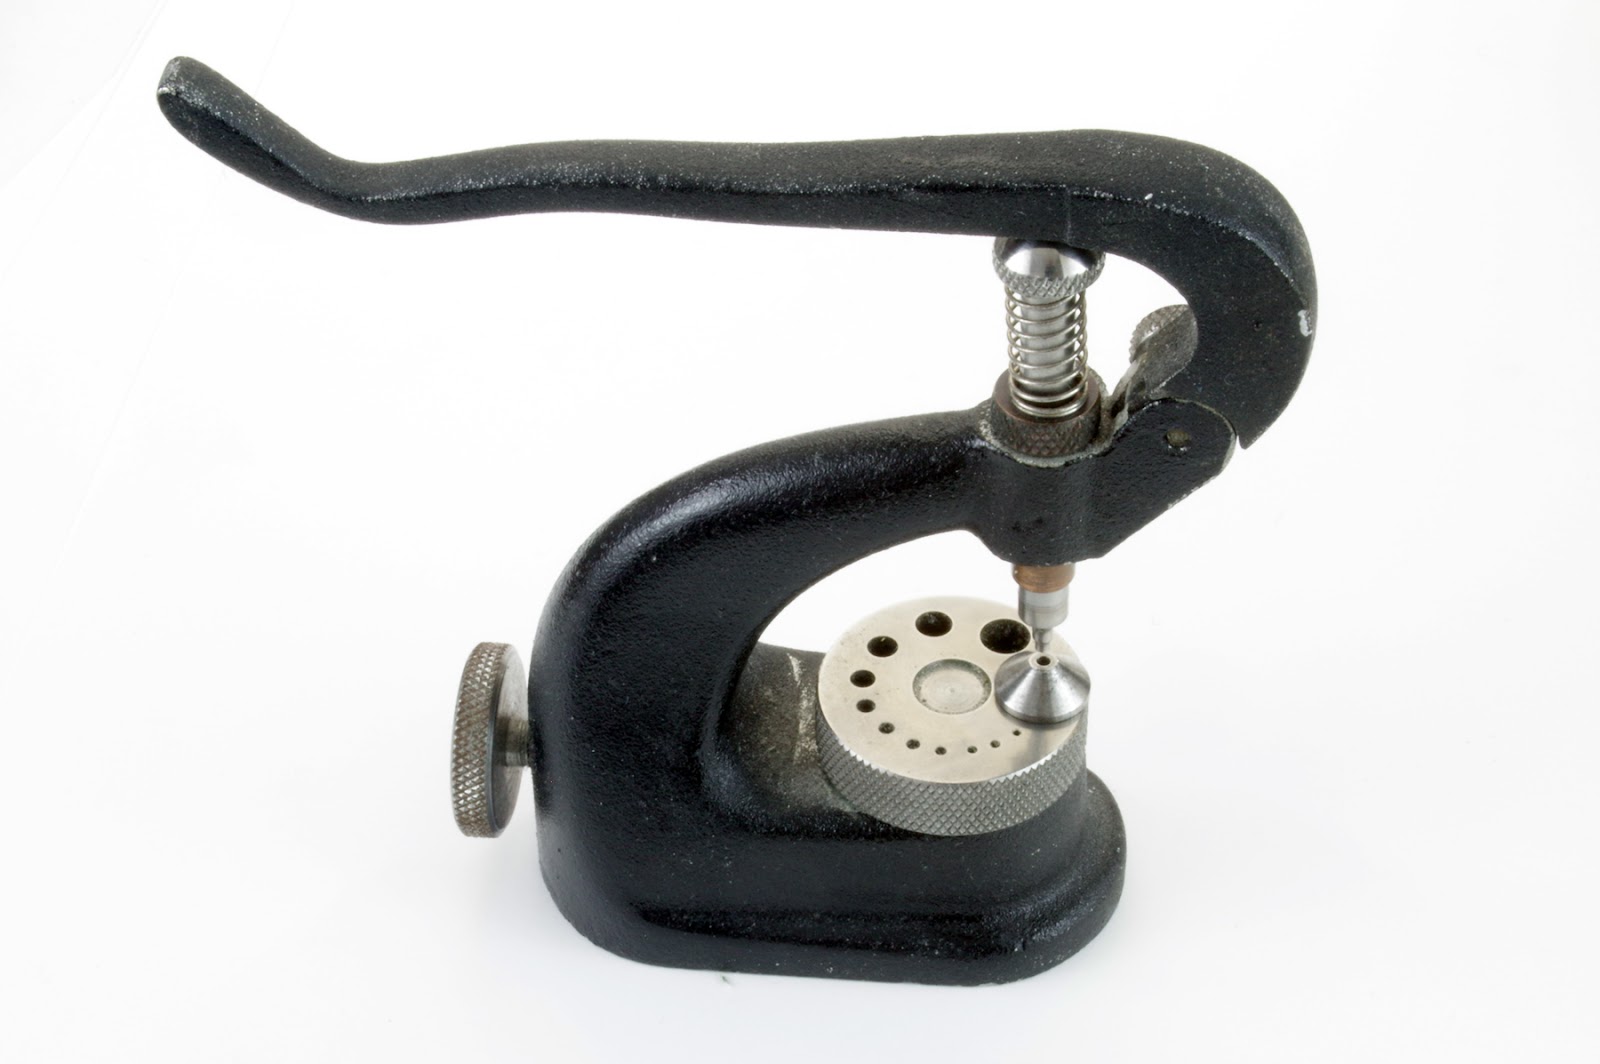
My staking set with leaver operation, a different anvil than this would
probably be used when pressing home a bush.

The result will be as efficient as the original.

A re-bushed centre wheel pivot hole that I did recently.

Although more expensive, sometimes a jewel will be used instead of a bush resulting in a higher jewel count than advertised:

This Waltham Traveler has been turned into a 15 jewel watch although I suspect
that was because someone wanted to do it rather than to correct a problem.
On occasion you may find the reverse with a broken jewel replaced with a bush, on the centre wheel this is very unlikely to cause any performance issues - European makers did not like putting jewels on the centre wheel in any case as they add little - except for appearance and marketing - and are susceptible to damage.

Bushes used to replace jewels at the 4th wheel and below will not be as efficient as a jewel and will be more prone to wear in the very long term.

A high grade Keystone Howard Series 5 with the top centre jewel replaced
with a bush. The original jewel was machine set and it was probably thought
that enlarging the hole to replace with a friction fit jewel would have left
the bridge dangerously weak. The brass bush however retains its structural
integrity. There is no noticeable increase in friction and the problem was finding
a mainspring that would not overdrive the movement rather than needing more power.
 

Saturday, 10 December 2016

A Bluffers Guide to the Watch Escapement Analyser and Timer

A small (size 4) movement on the
Vibrograf mount / microphone. The bed
can be moved in 3 axis to check timing
in any position. It will easily hold an
oversized S18 case.
Timing machines were originally hybrid electro/ mechanical devices, the "tick" of the escapement was amplified and used to drive an inked pen that drew a trace on paper moving over a drum turning at a fixed rate appropriate to the expected speed of the balance.

Modern computerised versions do much the same thing but give the results on a computer screen, sometimes in a similar format to the paper tape trace but with additional information. Most are dedicated units costing anything from about £650 to £7,000 or more and are orientated more to wrist watches than pocket watches and some do not, for instance, work with a slow train (16,200 VpH)  pocket watch movement and may not accommodate large cases.

I use a PC based product developed by Graham Baxter that uses the PC's audio sampling clock (usually at 96KHz) which, when suitably calibrated, gives an accuracy of better than 1 / sec per day with a high degree of stability and confidence. This software currently costs £299 with a clip on microphone which is more than adequate for most users. I have upgraded to a refurbished Vibrograf dedicated mount with a new microphone which is rather more robust for constant use, more resistant to background noise and is easier to use in some situations, the software also runs on a dedicated (cheap) tablet / laptop, mainly for convenience.


Click for an enlarged view.
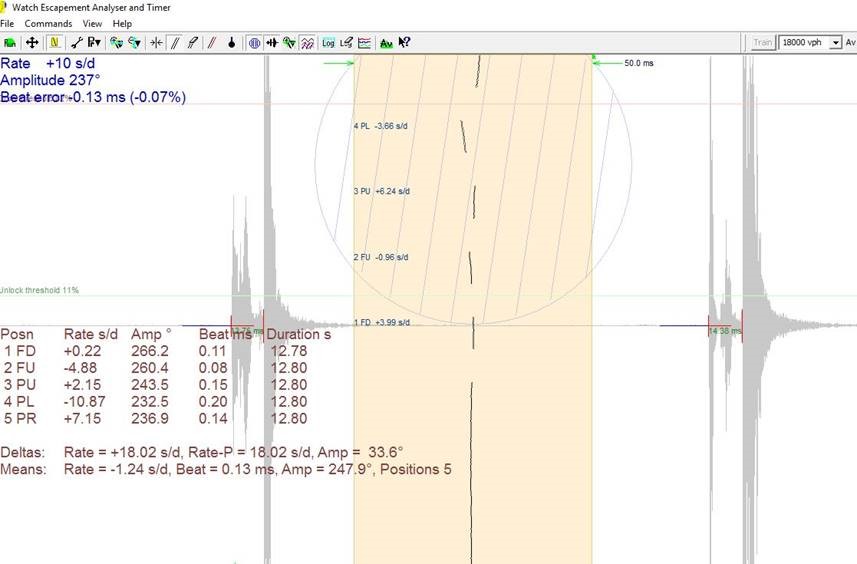
The sample trace here is from an exceptionally good restored 7J Waltham Traveler undergoing a test in 5 positions. The vertical lines in the centre moving up the simulated paper (the coloured band)show the odd and even ticks, here they are very close together showing that the watch is "In Beat", as the detail on the bottom left shows almost perfectly so with an average error in 5 positions (Face Down, Face Up, Pendant Up etc) of only 0.13 mSecs, about 0.07% on this quick train (18,000 VpH) movement.

A trace moving off to the left (up the screen) indicates the movement is losing time and moving off to the right it is gaining. Again in this computerised system that is also shown numerically, the old systems did not.

The trace that looks rather like an e.c.g. printout is the sound of the escapement unlocking, the impulse jewel going through the lever and the escapement locking again with two ticks showing - one to the left and one to the right so that a fault occurring when the balance is moving clockwise or anticlockwise can be seen, unfortunately it can't tell you which is which.

The distance between the three blips gives an indication of the amplitude or power of the movement, if they are close together (in time) the balance is moving quickly (strongly and with more turn) if far apart then slowly. Some clever mathematics, knowing the geometry of the escape wheel and other factors, allows the amplitude to be calculated and displayed in terms of the degree of rotation of the balance wheel.

With experience a lot of faults can be pinpointed by irregularities in the trace such as knocking, the hairspring rubbing the balance cock or balance wheel, dirty or miss placed pallet jewels, banking pins set incorrectly, etc., (If I remember I'll add an example the next time I find a good one) More detailed views and explanations of the display can be found on Graham's web site

The initial faulty trace from an 11J size 4 half hunter.
An advantage of a computerised system is that the readings can be logged and displayed in different formats and scales. This trace taken over an hour or so (not all shown) shows a movement with a problem, the top trace is showing time keeping errors in seconds per day measured every 2 seconds. As you can see it is varying quite considerably averaging around a 20 seconds / day gain but varying from 0 to 60 s/Day.

The lower graphs show the amplitude and the beat error (the later looks bad but the scale, that I left on automatic, is such that the deviation is tiny and quite immaterial).

By looking at the periodic nature of the trace we can see that there is 3 minutes between the peeks of slowness and also between the peeks of fastness of the movement. This has to indicate something wrong with the train. The centre wheel
And after the first attempt at resolution
turns once per hour so it is unlikely to be that, similarly the seconds wheel turns once per minute so is not likely to be the problem. That leaves the wheel in between.

Taking the movement apart the wheel was checked for cleanliness, deformed teeth and flatness and some adjustments made. After reassembly the test was rerun. Things have improved with the deviation less and the peaks now 6 minutes apart. Again the movement was taken too pieces and some more fettling done, mainly getting the wheel exactly at right angles to the arbor (axel). And the variation in timekeeping was reduced to a few seconds per cycle with average time keeping (at full wind) within 5 secs per day, which is pretty good for a watch made in 1891.

Unfortunately that was not the end of the story, checking the watch in different positions it was fine face up and face down but gained 2.5 minutes per day pendant up and lost a minute pendant down. Another hours work was required to fix that and before the advent of timing machines that would have been several hours over many days. But adjusting for positional errors is well out of the scope of this piece and takes up many pages in most good books on watch repair.


The final result
Left to run over night to settle down it was checked at about half wind over a fifteen minute period and gave very consistent results (the blip at the beginning was the result of moving the mount for the photo at the top of the page). Job done!

Or not done, having put the motion work, dial & hands on and put it into its case I found it was loosing 20 minutes per hour due to a slipping cannon pinion so all that had to be undone, the cannon pinion removed, adjusted and refitted (these 3 operations all requiring the use of the staking set on this design of watch) and everything put back together.

Thankfully on this occasion the first adjustment did the trick.


Wednesday, 16 November 2016

More on magnetism and watches.

Waltham 1899-Vanguard, 19J, 1902.
(click for a larger view)
A while ago I wrote about how magnetic fields can affect a watch movement, in particular how the coils of the hairspring could end up sticking to each other. This post is about something a bit different.

The Waltham 1899-Vanguard shown here came in barely running (although it was described as "in "good working order") after cleaning, a new mainspring and fixing a number of issues, including replacing a winding pinion that came from a 1908 model that is not compatible with the 1899 and which was causing winding problems, the movement was running with an excellent amplitude (swing of the balance) of 320 degrees.

However when it was put in the case this dropped to an unacceptable 200 degrees and the timekeeping went haywire. When this happens it is normally due to problems caused by compression or distortion of the movement in some way after tightening the case screws, either because of a fault in the movement or by some distortion in the watch case forcing part of the movement parts out of true or causing something to rub. After extensive investigation I could not find anything wrong.

Some degaussing equipment (Demagnetizers) shown on
the Cousinsuk.com web site.
I put the movement in a different watch case and it was fine so I got out the magnetic compass which went wild around the case and the problem was found.

Normally there is a trivial amount of ferrous material in a gold, filled gold or silver watch case, but this is a Hunter, and so it has two large and powerful steel springs in it to flip open the lid and to hold the lid closed. These had clearly become strongly magnetized at some point and that was causing the problem.

A few goes with the degaussing machine and all was resolved.

Sunday, 6 November 2016

A Bluffers Guide to replacing a balance staff and impulse jewel.

Perhaps the trickiest part of replacing a balance staff is getting the original balance assembly to pieces without damaging the hairspring, the balance wheel or the impulse jewel, however to explain that would take a as long as this post so I am starting with that done and with a balance staff available, again that may be a non trivial exercise as some movements have quite a few types of staff for a given movement and the one has to be found (and paid for @ £15 - £30 or sometimes a lot more!) - or made.

Click any image for a larger view.
The balance for this S16 movement is 0.6" / 1.5 cm
in diameter excluding the screws, some balances
are considerably smaller!
The first thing to do it to fit the staff to the balance wheel, that might need to be done in a number of ways but usually it will be a press (friction) fit or riveted.

This South Bend Watch Co balance is a press fit, the wheel is placed onto a stake (anvil) which has a hole in it just large enough for the staff to pass through, too large a hole and there is a risk of deforming the balance arms. Too small and your expensive staff gets stuck in the stake.

The staff is pressed into the hole using a punch with a hole drilled into it just large enough to accommodate most of the staff but small enough to rest against a step on the staff to press it in.

Frequently, as in this case, the hole in the balance it a tad to big for the staff, in this case after closing up the hole as much as possible with a specially designed punch it was still not a tight fit (due to the hard metal) and so it was necessary to use some Loctite retaining compound (not thread locker) which although quite strong can be release if necessary.

The part finished  assembly is then put onto the callipers which have a pair of jewels for the pivots to run in.

An index (bottom left) is moved close too the edge of the wheel and the wheel spun to check that it is square to the staff and flat.

Usually some manipulation is required to true it up, which can be tricky, especially with a cut compensation balance as an adjustment at the fixed end may require the arm to be twisted to ensure that everything lines up. As it does here.

It is best then to try the balance in the movement to ensure that it turns smoothly with minimal resistance. Particularly if a previously repairer has made adjustments to compensate for a wearing staff, adjustment will frequently be required to get the correct "end float", firstly by undoing all of his adjustments and then preferably by adjusting the position of the balance hole and cap jewels. This process can take as long as all of the other steps put together.

It is now time to fit the roller, in this case however the impulse jewel was crumbling and although it would have worked failure would not have been far off so it had to be replaced. This is a very fiddly job and invariably results in the loss of some quite expensive  jewels which are small and difficult handle and also to measure so trial and error is required.

In this case the jewel was cylindrical but with one side flattened. The full diameter was just 0.41mm (they come in steps 0.01mm big). The vice being used is a happy co-incidence of a hobby and business / hobby and is normally used for tying fishing flies, the jaws stay parallel in normal use, it gives a firm grip and  it can be rotated as required. The down side is that one of this quality would be rather too expensive to buy just for fitting impulse jewels!

After getting the jewel into the hole it has to be secured in place ensuring it is at right angles to the roller in both plains, traditionally this was done with heated shellac on the reverse side but modern equivalents are somewhat easier to use.

The roller it then pressed onto the balance staff using the staking set taking great care not to break the jewel or the staff either by getting things misaligned or by having a punch of the wrong size.

The impulse jewel should normally be at right angles to the arms (of a 2 arm) wheel, if not then positional errors may result. The red marks on the wheel were put there to indicate where the impulse jewel (and the hair-spring stud)  originally aligned in the hope that they were then correct and the watch will be in beat on completion.

At this point it is advisable to again put the balance into the movement to check that the impulse jewel engages correctly with the lever pallet and that they do not rub together, and if it is a single roller, that the pallet safety pin engages correctly.
This had a two piece double roller so next to go on was the smaller section.

A critical part of this operation is to ensure that the cut out in the small roller EXACTLY lines up with the impulse jewel, if it does not problems lie ahead!

After fitting the balance is again trial fitted to the movement to check that the pallet safety pin engages correctly with the roller.

Almost there now!

The next operation is to fit the hairspring, the balance is turned over, usually with a smaller stake to support it.

With a double roller this is relatively straight forward (if there is a spacer between the two sections to support the smaller section) but with a single roller the stake must not foul the impulse jewel, this particular staking set has a stake available with a cut out in it for the jewel to fit in, with others it is necessary to find a stake (or punch used as a stake if the set allows that) with a drilled hole large enough to accommodate the staff but an outside diameter small enough to fit inside the jewel. Get this wrong and the jewel breaks, the roller will have to come off and a new impulse jewel found and fitted.

Making sure it is aligned correctly so that the movement will be in-beat, hopefully using marks made earlier, the spring collet is pressed onto the staff.  It is now ready for fitting and testing.

Sunday, 18 September 2016

Stakes, Staking Tools & Jewel Setting Tools.

A modern Staking Tool and a modest selection of
Punches and Stakes by premium Swiss maker
Bergeon, £420 from Cousinsuk.com 
A stake in watchmaking (and jewellery) is a form of anvil used with a punch for riveting and other operations, simple ones are held in a vice and the punch, which is hand held, is hit with a hammer or pressed down by hand. Whilst a number of things can be done this way it was literally rather hit and miss on delicate jobs, especially when the stake, work (usually in 2 pieces) and punch has to be perfectly aligned.

To make things easier a device known as a “Staking Tool” was developed, this included a mount for the stake and an accurately machined tube for the punch aligned above it.

A hammer or the hand are still generally used to perform the required operation but more precise positioning is possible.
These are still made and with a comprehensive set of punches retails for between about £200 (Indian made) and £800 (Swiss made).
My old lever operated Staking Tool which could, at some
 risk due to the lack of micrometre adjusted limiting,
 be used for jewel setting and other delicate tasks. Otherwise
it is an excellent tool and has a particularly wide range
 of anvils and good screw on solid and drilled pushers.
A refinement of the standard Staking tool, which appears not to be available on modern staking tools but is on Jewel setting tools, added a lever arrangement to force the punch or other tool down, this made it much more controllable and easier for operations such as jewelling, work on balance assemblies, etc..
The major limitation was the lack of a device to limit the movement when pressure is applied so that it was very easy to push things too hard and too deep, so the next development was the Jewel Setting (or Jewelling) Tool which does, with the right accessories, some of the things the “Staking Tool” can do but which includes lever actuation and a micrometre measuring and limiting device and
My somewhat later Boley & Leinen combined Staking
and Jewelling set with an extensive range of punches that can
also be used as stakes. Modern Bergeon Punches will fit so some
damaged pieces have been replaced. Purchased (fortunately
 at a bargain price) to extend the range of my original staking set
 shown above. The rather worn jewelling tools are generally
not used as I also have the modern Seitz set shown below. 
usually made with more precise tolerances generally.


It is claimed that work with the modern Seitz tool can be done to within 0.005mm, the down side is that it is smaller both in the diameter of the punches and more importantly in the depth of the hole drilled into some punches and stakes which is not big or long enough to take some pocket watch components so, for instance,  it is not possible to use a jewel setting tool to rivet a centre wheel back on to the centre arbour of a pocket watch if it has been loosened by a breaking mainspring (Watches without a Safety Pinion often have the wheel weakly riveted on so that this fails to prevent damage further down the train).
A modern Seitz Jewelling Outfit with a good number of
pieces, most of which can be used as a Stake or as
an anvil. £1,050, also from Cousinsuk.com.
The Bergeon / Seitz set I have just purchase cost over £1k, it might not pay for itself in cash terms compared to just having my previous tools, but it should make delicate operations rather less stressful and will allow me to do jobs such as Lanterning Cannon Pinions (nipping them in to prevent slipping) more accurately and to reduce hour hand holes to fit which was not possible before. And of course to reset or replace jewels with a greater chance of success.

It will hopefully also reduce accidents, cursing and swearing somewhat.

Sunday, 17 April 2016

Fitting a minute hand

Before opening the front bezel - in the same way as the back, either by screwing it off (use a rubber or  latex glove if it is stiff) or using a knife - clear a workspace and work over a white sheet of paper so that if the seconds or minute hands drops off you will be able to find it again.
 
References to key set watches are to those which are set from the front, those that set from the back such as a Benson Ludgate are treated as a keyless watch.
 
The only tools normally required are a strong pair of tweezers and a knife to open the bezel. It is possible to use side snips or other tools in place of tweezers but generally this is not recommended. It is perhaps easier to do this with the watch stopped but it is not essential. With a key set watch tools are probably not required, just the key. A loupe, bench magnifier etc. will make things easier.

A hand may come off of a watch for a number of reasons, the watch being knocked or suffering a lot of vibration, perhaps in the post, or the hand being brushed whilst setting a key set or open faced lever set watch. The hand may not come off immediately but if it is depressed a little - a common result of pressing on the flexible acrylic crystal of hunter type watch - then it may later come into contact with the hour hand and either stop the watch or be lifted off.

I suspect that rapid changes in temperature may make a hand more susceptible to coming off and a newly restored watch is more susceptible than one which has not been cleaned or disturbed for years. Being sent through the post is probably going to put the most strain on it.

A front key set watch with a square
topped cannon pinion to take the hand
and the setting key.
The minute hand fits onto the cannon pinion (see my blog entry on slipping cannon pinions for pictures of the cannon pinion and motion works below the dial), usually the top of the cannon pinion will be flush or close to flush with the top of the centre wheel arbor as shown in the two examples here.

On a few, mainly Swiss, watches the centre wheel arbor is hollow with a pin through it which protrudes above the cannon pinion, even though it will appear that the minute hand attaches to the pin is does not, there will be a hole in the minute hand for it to go through but there will also be a circular ridge under the hand which fits to the top of the cannon pinion - if the pin did hold the hand it would not be possible to adjust the time.

Before fitting the minute hand make sure that the hour hand is fully down, reasonably parallel to the face (top picture) and clearing the seconds hand.

Position at 12
First set the hour hand to twelve o'clock.

Key set watches only: If the watch is key set and the hour hand has been moved you will first need to line things up as the minute hand can only go onto the arbour in one of four positions, loosely fit the minute hand - which should be easy as the square cannon pinion top is tapered - set the minute hand to 12 o'clock then carefully adjust the hour hand to point at an hour using tweezers close to the centre. It is assumed that the hour hand will move fairly easily or it would not be displaced but if it does not move easily lift the hour hand off with a  removal tool or with tweezers underneath the central hub and reposition.

Position the minute hand onto the cannon pinion as shown, pointing to 12 o'clock..

Saturday, 19 March 2016

Sometimes you have to improvise, fixing a hunter case.

I recently acquired a rather nice Hunter cased watch, the main problem with it being the lid not opening when the crown was pushed. Taking it to pieces I found that the tube that goes around the winding stem to activate the opening on this type of watch was missing. And I did not have one long enough in the spares box.

Just as I was starting what promised to be a long internet search for a small quantity of metal tube with the right internal and external diameters I had a brain wave: To help them sink, salmon flies are sometime tied onto brass, copper or alloy tubes of about the required size, so a quick rummage through the fly tying box, the plastic liner pulled out of a tube, a few seconds on the lathe to shorten it (easier than sawing it and less likely to cause distortion) and I have a fully functional watch case! J
 
Now to do the movement.

Sunday, 21 February 2016

Adventures with a Watchmakers Lathe - Part 1.

NOS Balance staffs for a size
16 watch - these for a Moeris
are particularly simple ones!

As with all pictures here click on
 the image for a larger view
There are a few watchmaking repairs that can only be done with a lathe and similar tools, the most critical being the manufacture of replacement balance staffs. Whilst replacement staffs are available from New Old Stock (NOS) for most watches by Waltham and several of the Swiss makers such as Cyma/Tavannes and Revue (that is one reason I deal in those makes) it is becoming increasingly hard to find them and prices are correspondingly rising, also NOS staffs are not available for any English watch made pre WWII.

For sometime I have been contemplating buying the necessary equipment and investing a considerable amount of time learning how to use it - several weeks full time I suspect before usable staffs are produced -  I haven't used a lathe since my apprenticeship days which was rather a long time ago and that lathe was about 6 foot long.

Having bitten the bullet and decided to do it I have finally managed to buy a second hand lathe and whilst I am closed for business awaiting the new financial year and for the supply of watches to pick up I will be writing a few blog entries to chart progress and to describe key aspects of the lathes use.

The first problem is the cost of a lathe, a new fairly comprehensive (but not complete!) set up by Bergeon, a premium supplier of quality watch and jewellers tools, is currently £27,594 (plus cutting tools and other bits and pieces) so that is clearly out of the question, even a "budget" watchmakers lathe by "Star" to a basic specification and with no motor is £2,874 and would require quite a few extras to make is usable for making staffs.

My Pultra 10 Lathe after
a days worth of restoration.

So clearly second hand was the way to go, after several failed attempts I was very fortunate to acquire an excellent English lathe by Pultra probably made in the early 1950s and with a very good specification. I was particularly fortunate in that some one tried to "snipe" me with a bid in the last 10 seconds of the eBay auction and I won by 12 pence!

A couple of the collet chucks (more of which in a later post) need replacing at between £20 and £45 each new (depending on size) or £10 - £15 used and I may want a few more, but apart from that it has all of the pieces necessary, except a motor which the seller has yet to auction.

However I have decided to go with a new electronically controlled motor which is on order, it is not designed for this type of lathe so will need some work to mount it and the lathe onto a base board and to connect them up.

One interesting feature of watchmaking lathes in general is that they are operated very much like a wood turners lathe with the cutting tool hand held, this close up shows the tool rest (not in position in the picture - in use it would be closer to the centre line). This particular one is a premium "tip over" type which can be folded back to allow access to the work for measuring etc. and then tipped forward, back into position without having to reset its position.


The whole lathe is 10.5 inches long and the tool rest only an inch long so this is pretty small precision engineering!

It was missing a few, mainly non essential but nice to have things, most of which I have now sourced and hopefully they will all be here in a week or so.

So far the total cost is about £1.2k but small compared to £28k for a Bergeon!

Click on "Lathes" under labels to the right of the page for other articles in the series.


Friday, 22 January 2016

Restoring a Silver Watch Case

Click on the images to see a larger
version.
A while ago I posted a description of how a watch movement is cleaned, in this post I explain how I restore a silver watch case. The case in question was made by John Woodman of Smith St, Northampton Square, London in 1888.

From the wear pattern you may be able to see that the back of the case is depressed, there is also a dink bottom left and there is a lot of pocket wear, in reality it actually looks worse than in the picture. So something had to be done.


The first stage is to get rid of the worst of the muck and oxidisation, this is done with silver polish and a glass fibre brush.

If this were not done the next stage would not work as effectively and the fluid would have to be changed more frequently, perhaps after each case.


The ultrasonic cleaning is primarily to get into the parts other processes cannot reach including into digs and scratches. The fluid bath is detergent based and the case will stay in for 30 minutes which seems about optimal for a silver case.

The second ultrasonic machine shown is loaded with a solvent based cleaner that I use for cleaning movements.


The next stage is to press, rub or hammer out the back and the dents. This process will be different depending on the way the case is made and any finish such as engine turning on the back. Swiss cases in particular are sometimes made with a bezel similar to that on the front with a silver disk inserted - if you press on that to hard it will come out and be a devil to get back in and it you hammered the edge probably impossible.

It is better to press or rub rather than hammer as it will cause less damage to the inside which is difficult to burnish out due to the shape of the case and the necessity of preserving the hallmarks. The amount of work done on the outside has therefore to be balanced with the amount of damage to the inside and possible distortion of the case which may or may not be readily correctable.

The picture above shows the case after this work, the dink still visible but it is now more of a scratch or dirty mark.

For a case with a smooth back now comes burnishing with increasingly finer abrasives. A balance has to be struck between the amount of silver removed compared to the gain achieved in appearance and possible loss of structural strength.

In general I do not try and take out all of the marks but to still give a nice finish. All of this is done by hand.


Saturday, 2 January 2016

The Safety Pinion (Fogg's patent)

A Reversing Pinion prior to assembly.
The Safety Pinion originated in 1865 when it was usually described as "Fogg's patent", it was intended to avoid damage to the movement in the event of a mainspring breakage, the spring being let down too quickly during maintenance or following failure of the click (ratchet stopping the mainspring arbor from "winding down" and forcing the barrel to move instead).

The problem was that with the very strong springs required at the time the backlash after a failure would go through the train and potentially break weaker parts, mainly I suspect the lever pallet and pallet jewels.

The solution is quite ingenious. Instead of the centre wheel pinion being fixed to the wheel / staff it is screwed on. In normal use the gear teeth on the mainspring barrel bear against the pinion and keep it screwed down.
A "Reversing Pinion" during assembly
but not yet screwed on.

If the pressure is suddenly reversed the pinion unscrews and no reverse power is applied to the rest of the movement.
This solution was initial used by Waltham and then by Elgin who presumably licenced it, but by the 1890's, if not earlier, the concept was more widely used in the USA (the example shown is from a Seth Thomas of 1896) and by a number of the larger makers in England including The Lancashire Watch Company and William Ehrhardt.

Waltham later introduced the "Safety Barrel" to address the same problem but as the amount of power a watch required reduce with the introduction of lighter movements, improved manufacturing tolerances and more jewelling, there was no longer a real need and safety pinions were discontinued.

Thursday, 5 November 2015

Whats in beat?

A Swiss lever escapement
If you have ever set up a pendulum clock you will know that it is important to level the movement so that the pendulum swings equally to the right and left of a centre line that is perpendicular to the base of the movement, this will help in timekeeping, make the clock easier to start and, if it is driven by a spring, it will be less likely to stop as the spring gets closer to being fully wound down. It will also result in a nice even "tick - tock". 

It is the same with a watch except that it is now the balance wheel which has to swing an equal amount left and right from it's "in beat" position  - which for a Swiss Lever escapement is when the impulse jewel, balance staff and the lever pallet arbor are in alignment with the movement at rest. Its a little more complicated for an English lever with the pallet tangential to the escape wheel.
 
Before the advent of electro-mechanical and now computerised escapement analysers watch makers and repairers had to adjust  watches to be in beat by visual alignment and listening to the movement through a type of stethoscope, it is impressive how they achieved the accuracy that they did but some errors are fairly easy to detect by listening to the watch.
 
This is my Waltham 1899 Riverside Maximus from 1901, the movement is 0.3 milliseconds (mSec) out of beat which at a nominal rate of 18,000 vibrations per hour (VHP) is an error of 0.17% - that is as close to perfect as you are likely to hear from a 114 year old watch so run the video to see what it sounds like.


The next video is of  a job in process and the movement is currently out of beat by 2.1 mSec or 10%, run this video and you should notice the arrhythmia.


Correcting an out of beat movement is likely to be a combination of reforming or tweaking the hairspring (in this case it needs major reshaping due to previous tampering and there is a real possibility of work hardening causing the spring to break when adjustments are made), turning the roller or preferably the hairspring collet on the balance staff to improve alignment and possibly some adjustment of the banking for fine tuning.

Wednesday, 8 July 2015

Fitting a pocket watch crystal

Usually you can easily press out crystals from the inside, especially those not glued in, so be careful if you have the bezel open for any reason - not recommended except on lever or front key set watches! This is how to refit it if it comes out or if a replacement is crystal is to be fitted.

This assumes a hinged bezel, if it is a snap on fit remove it in similar fashion or if it is a screw on type screw if off then just ignore the bits related to the hinged type.
 
It also assumes an acrylic crystal, a glass crystal can me fitted in a similar way but do not try bending it!
   
First open the bezel using a knife at 1 o’clock if it hinges at 6 o’clock or opposite the hinge if it is hinged elsewhere. Be careful of the hands! Work over a plain surface such as a piece of writing paper so that if you should knock one off you will be able to find it.
 
Seat the crystal into its groove at 6 o’clock,  then work round both sides together pushing it into the grove, have your thumbs underneath pressing with your fingers on top.

As you get close to the finish you may need to apply pressure upwards towards the centre of the crystal with your thumbs whilst pressing down with your fingers to bow the crystal up in the centre and down at the edge, this should let you seat the crystal into its groove so that when you release the pressure it is held in firmly.

Old glass crystals are usually not perfectly round so if it is a little loose try rotating it in the bezel until it grips.
 
If it becomes necessary to glue the crystal in than the correct type of glue must be used so that crystal can subsequently be removed and any surplus removed relatively easily - which should be done when the glue if partially set.
 
Before closing or refitting the bezel check that you have not displaced the hands, particularly that the hour hand clears the second hand (or the second hand clears the minute hand on a watch with a centre sweep second hand) and that the minute hand clears the hour hand.

Wednesday, 11 February 2015

Does non-functional Geneva gear matter?

This post was prompted by my restoration of three watches by Rotherham of Coventry (an unusual number to have in at one time!) two of which had fully functional Geneva stop gear whilst the other was missing part of the device.

As explained in some detail in this previous post Geneva Stop gear is designed to limit the maximum and minimum pressure from the mainspring to help control isochronism (varying time keeping as the watch runs down).  But quite frequently the "nib" on the central portion is broken or the other section is missing altogether. This is, I suspect, normally down to previous repairers letting down the mainspring too fast which is easily done. It may also have just worn out, broken as a result of some other fault or been removed to give the watch a longer run time.

A modern
Mainspring
So does it matter that it is broken? Well the answer, as is frequently the case, is yes and no.

Yes it matters because the watch is not complete, so I always discount them a little. And yes if a contemporary mainspring was used it would most probably have a noticeable impact on time keeping.

But thing have changed in the way that mainsprings are manufactured; in the 1800's and into the twentieth century mainsprings were made equally thick through out their length so that as they unwound the pressure from the still wound coils delivered unequal pressure over the period.

A modern mainspring on the other hand  is made so that the strength varies along its length to reduce variation in pressure. This significantly mitigates the problem so that on a 120 year old watch the affect on timekeeping is unlikely to be significant or noticeable without close monitoring.

Wednesday, 31 December 2014

The dreaded bodged impulse jewel "fix".

Waltham 1908 model Balance
assembly.
A frequently fatal (to the watch) previous repair that I find quite frequently, both recently done to be able to sell a watch and others done many years ago.

Horologists please excuse some simplification and omissions here! Likewise I hope the non-specialist will not be too phased by a little bit of jargon.

What is the impulse jewel?


The impulse jewel is part of the balance wheel assembly, it is a small, often "D" shaped pin like jewel and is mounted on the "roller table".

The picture above right shows the balance assembly from an unrestored Waltham-1908 movement, the roller is the small disk in the centre of the picture with the balance staff (axel) going through its centre and the impulse jewel on the right - it is easier to see if you click on the image for a larger view.

Waltham 1883 movement. The lever
pallet is the dark bar like piece to the left,
the pallet forks are on its right side.
The escape wheel is below it (not quite in
position). This is laid out tangentially  as
an English lever but has a club tooth
escape so is a Swiss Escapement.
As the balance oscillates to-and-fro the impulse jewel contacts the pallet (lever) fork on each swing flipping it from side to side - the "tick" of a watch - this lets the escape wheel at the other end of the lever (on a Swiss escapement) or to its side (English escapement)move on one tooth for each swing and through gears this makes the second hand turn once a minute, the minute hand turn once an hour etc.

By some clever engineering  the impulse jewel also gives the balance a "kick" to keep it moving, it does this twice with every swing on a Swiss Lever escapement with a club tooth escape wheel, once on the unlock and once on the lock) and once every swing with a traditional English Lever escapement with a ratchet type escape wheel.

On an average size 16 or so pocket watch the roller is about 3.5mm / 0.14" in diameter so you can see that the impulse jewel it pretty small. And sometimes they break.

Thursday, 4 September 2014

Cleaning watch movements.

Face plate of a movement by the
Lancashire Watch Co before cleaning
I was recently asked on Facebook how I cleaned the particularly dirty watch movement shown, that reply whilst covering the essentials was necessarily brief so here is the full story.

The obvious thing to do and the recommendation of most books on watch maintenance for the amateur, is to use metal polish and indeed this in combination with other techniques will work and can be a quick way of getting the top plate of a movement clean and shiny [see this later post for an example], however there are some significant disadvantages firstly it is purely a cosmetic exercise not getting into the nooks and crannies of the watch or helping with the cleaning of the critical moving parts and secondly there is a real risk or removing the gilding from a gilt movement or the often very thin nickel or other coating frequently found on Swiss watches. The better method is not cheap as it requires the purchase of special cleaning and rinsing fluids and an ultrasonic cleaner cleaner.

The fluids are designed to allow the cleaning of “complete movements” as it says on the label. I do not think this is a good idea for old pocket watches, particularly those with motor barrels that can not be removed without taking the movement to pieces, as the fluid will interact with the oil in the barrel making it ineffective and judging from a few movements I have had in that have been done this way and from my experience with leaving too much oil on the movement before cleaning, it is likely to cause bad staining of the movement as the mixture spreads over the watch. In any case if the movement is to be cleaned properly then it needs to be taken to pieces so its best to do that up front.

This is the way I do it:
 
The same LWC movement after cleaning
 1. The movement is first broken down into its major parts, the top plate being removed together with the train, escapement and motor barrel. I leave the winding and setting gear in place if it is fixed in as the components are too small to easily handle. The mainspring is removed from the barrel.

2. Any obvious oil on the plates, barrel etc. is removed with tissue or a cloth, then loose material removed with a tooth brush with some mentholated spirits if necessary to get rid of thickened oil and other significant deposits. 

3. Everything goes into the cleaner for 10 minutes. Whilst ultrasonic cleaning is a relatively gentle process it does lighten gilding a little, particularly on very old watches, and it is best not to over do it, a really dirty piece might get and extra five minutes but no more. 

4. Pieces are then put into a rinsing fluid to get rid of the solvents and to chemically remove any water that might be present. After patting dry with tissue and blow drying the hairspring they are left to dry before the next stage. 

At this point it is worth mentioning one additional cleaning problem that may have to addressed. Sellers of old watches, on eBay in particular, are eager to be able to describe them as “working” or “ticking” so are liable to soak them in oil (lengthening part 2 of the cleaning process) to get them moving and occasionally spraying the whole movement with WD40 or similar. The later process will undoubtedly cause the hairspring to get coated in oil, the former will only probably do so. This will mean that although the watch may tick the coils of the hairspring will stick together and if the watch runs for more than a few seconds it will typically run  fast and erratically. The same effect may happen naturally over a very long period through corrosion or leakage of oil from the barrel. In both cases it is unlikely that the ultrasonic cleaning will be enough and it will be necessary to resort to some very strong solvents to clean up the hairspring.  

5. Some of the winding gear may be removed for inspection at this stage and, particularly on some English keyless movements, to allow easier reassembly of the movement.

And the top plate of the same.
6. As the movement is put back together everything gets a final hand cleaning with a toothbrush which should remove any lingering pieces of crud and in particular fluff and hairs which frequently get wound up in the wheels. Smoothing broaches, peg wood and other implements are also used to make sure jewels, pivot holes etc. are clean. This is also the time to visually check that everything is complete, undamaged and the correct shape.

7. After reassembly the movement is wound and immediately put onto the escapement analyser to make sure that the new mainspring is not over strong which among other things threatens to break the impulse jewel if the balance wheel turns by more than 360 degrees.

Some watches may run well immediately and can be given an initial regulation, using the analyser, and adjustments to get it into beat and to reduce any positional errors, others will take their time to get going but all need to run for 24 hours before going on the analyser again. If I am fortunate that will be the movement done, if not it could mean a lot of work making repairs, fiddling with the hairspring, etc.

Tuesday, 29 July 2014

Newsome dial replacement.

Replacing a dial with one from a different type of watch is something I have managed to avoid doing in the last five years but this rare size 10, 17 jewel watch by Newsome of Coventry has been waiting for a replacement dial for a couple of years with nothing even close coming along so I decided to bite the bullet and modify a dial.

This posting shows how it should be done, and that is not by clipping off the fixing pins and using Blue-Tac or glue to fix the dial to the movement, a technique I see used fairly frequently on watches I buy in.


The first thing is to find a dial from the right period that is of the right size with the hole for the second hand in the right place. You then need some replacement dial feet.


Normally these can now be glued or soldered to the face but on this movement the dial is retained with pins rather than clamped in with screws, so the feet first have to be drilled with a 0.5mm drill held in a pin chuck. A fiddly job as the pins are round.


The pins are then positioned in the movement with "springy" dial washers or similar underneath to get the flat end of the pin high enough to contact the dial, the newly drilled securing holes have to be lined up so that the brass pins can be inserted  when the movement is finally assembled.


A thick glue such as the resign based Araldite or Loctite Hysol is then put on the feet plates and the face carefully positioned so that the centre hole is in the centre and the seconds hand hole is correctly aligned.
 
And there we have it, a hundred and two year old watch has a new lease of life.